
Friday, July 10, 2009

New Medallion Background Stamp

You are going to just LOVE this new stamp! I think it might end up being one of the most versatile backgrounds I have - so you know that you'll be seeing a lot more of it!!

I was just finishing off prepping for the Friendly Wheels class tonight, and because I am such a messy, there were a lot of scraps lying around! So I decided to use them to play with the Medallion stamp this afternoon.
Oh, and did I mention that I got the new impressions folders too? LOVE THEM!!!
You can see the detail that these impressions folders make in the cardstock - fabulous. And really easy to get ink on them if you want to add even more depth to them!
Big Tip: You really DO need the silicon mat for your Big Shot to get the best out of these folders.
The flowers in the focal element are form the new Level 1 Hostess Set, Country Morning. Another rooster in that set, and you all know how I love me some roosters!!!!
To get your own FREE Country Morning set, all you need to do is host a get together with your friends and have minimum orders of $150, and it's all yours baby! Along with some Stampin' Up! Bucks to spend (now, that's not the actual name of the Hostess Benefits, but it sounded cool!!!) Call me today to get your date in my calendar so you can be stamping with this fabulous set very soon!

Hugs
Megan

Recipe:
Stamps: Country Morning (Level 1 Hostess set), Medallion background stamp, Teeny Tiny Wishes
Paper: Kraft (card base), Mellow Moss, Night of Navy
Ink: Mellow Moss, Night of Navy, Stazon Black
Accessories: Finial Press Textured Impressions Embossing Folder (for the Big Shot), Word Window Punch, Sponges

Visit my Stampin' Up! website here to order these supplies directly from the web!


Thursday, July 2, 2009

The new Catalog is LIVE!

Here it is!!! This is absolutely GORGEOUS! It has a different layout than past catalogs, and has a sumptuous matte finish... Yum Yum. There are so many fantastic new sets and accessories in these pages - you'll want to make a cup of tea and sit down and just enjoy every page!


What? You haven't got one yet? Well, not to worry, I have one set aside just for you! Give me a call (303 805 2344) or send me an email, and I'd be happy to get one in your hot little hands! I'll just need a phone number so that I can five you a ring and see what you thought about it!


And that's not all folks! No, there's no steak knives - but Stampin' Up! is having weekly specials! Yep - every Monday they will post another special. How cool is that?! You can go to my SU! website here and order it right there and then, or just come back and visit here every Monday for the update.


This week it's one of my favorite tools - the Scallop Edge Punch.

So - what are you waiting for? Give me a call and get your hand on a catalog and place your order to get in on this week's special!

Hugs

Megan


Tuesday, June 30, 2009

Circle Circus Birthday

I saw a color challenge this morning and was really taken with it. Not Quite Navy, Old Olive, So Saffron and Rose Red. Don't they look stunning together?

Today's big tip is this: When you want to use the same colors on a sentiment as background stamping, stamp off the first 'generation' and use the second or third. To make that clearer - every time you stamp an image after you have inked it up we call a generation. Thus - first stamp, first generation; stamp again without re-inking it, second generation; stamp again and it's the third generation.

You can see it on the little panel with the birthday sentiment. I really wanted to use the same colors as the main panel, but I knew that Not Quite Navy and even the Old Olive would be too dark. So, I stamped the circle image onto my grid paper once first with the Old Olive before stamping it onto the Whisper White, but stamped it off twice with the Not Quite Navy. Now you get a cohesive look without having to look for a lighter color that co-ordinates! What a time-saver!!

Another Big Tip: Use the Mat pack to line up your brads so that there is an equal space between them all. Seriously, that little kit is AMAZING!

Try it yourself next time that you want to get your background the same colors! And if you would like to get together with your friends and have me give you all a private class on this or any other technique, just drop me a line! I'm booking my July 'funshops' now, so call quickly to get the date you want before it's gone!

And just a reminder that the new Stampin' Up! Catalog goes live tomorrow! You can place an online order on my SU! website here.

Recipe:
Stamps: Flight of the Butterfly, Upsy Daisy (sentiment)
Paper: Rose Red, Not Quite Navy, Old Olive, So Saffron, Whisper White
Ink:Rose Red, Not Quite Navy, Old Olive, So Saffron
Accessories: Earth Elements (Not Quite Navy) brads.

Hugs
Megan

Monday, June 29, 2009

Distressed Spots

I thought that I'd have a bit of a play with my embossing folders for the Big Sot today. What a lot of fun!
This background was run through the smaller spots embossing folder (Stampin' Up! Background folders 1) and then to give it this great distressed look, and to bring up the white under the printing on the DSP, I used the sanding block over the top. It's kinda hard to tell from the picture, but every one of those cute dots is raised and then sanded - it feels really cool as well as looking great!
Big Hint: Make sure that you sand in all directions, and do it lightly - the paper tears pretty easily if you are too heavy handed!
I also had a go at another fun technique with the embossing folders, and you can see that over on my Facebook fan page here. If you're not a fan yet, become one so that you don't miss all of the great exclusive content that I post there!
The new catalog goes live on Wednesday! It's just so exciting! if you haven't gotten your hands on one yet, give me a call or send an email so I can get one to you quick sticks. this is one of the best that I have seen in a LONG time!

Recipe:
Stamps: Pocket Sillouettes, Trendy Trees (sentiment)
Paper: Perfect Plum (card base), Barely Banana, Sale-a-bration DSP (retired and exclusive for the sale-a-bration promotion- make sure you get the freebies next time it rolls around!)
Ink: Perfect Plum
Accessories: Big Shot embossing folders, Collozzle cutting system, word window punch, new punch, retired yellow ribbon, sanding block

Hugs
Megan


Thursday, June 25, 2009

Just hanging around for you!

Isn't this cool? I had a dream about this card last night, so I thought I'd better try to get it made before it went out of my head!
I had wanted to do some more brayering for a while, and this gave me the perfect excuse!
First I brayered Gable Green along the bottom of the card. (To brayer like this you run your brayer length wise along the ink pad, scooching it just a bit more around every time. Then you run it along the card again and again - it kind of smooshes all together. Like all of those technical terms???) Then clean your brayer and repeat the process at the top of the layer with Summer Sun.
The layer that has all the brayering is Whisper White and it is 5 1/4" x 4". That's the standard size for a first layer on a standard card! (Just a little helpful hint there!)
Next, I stamped the tree trunk from the stamp set "Branch Out" in Basic Brown on either side of the layer. The leaves were stamped in Mellow Moss and Old Olive, use the lighter ink first (Mellow Moss) and then you wont have to clean the stamp - just stamp off the excess onto your grid paper! Was that another helpful hint??? I think I'm going for a record here!
I sponged around the outside of the card lightly with the Basic Brown ink. The Crop-a-dile is perfect for getting the holes cut out on the branches, and on the "swing"! Use the smaller hole for eyelets.
The "swing" is a large oval punched out of Chocolate Chip, a small oval punched out of Gable Green and the saying punched out of Whisper White with the Word window punch. Helpful Hint number 3!!!! ALWAYS stamp the image before you punch it out! If you've ever tried to line up a stamp on that skinny little word window you'll understand why. If you are smart enough not to have done that - don't!!!!
I used the linen thread through the eyelets (from the Earth Elements container) and tied it all kinds of weird and wonderful ways. I'm sure I don't have to tell you that I was not a Girl Scout!
I then backed it onto a piece of Chocolate Chip and pt that onto a Glorious Green card base.
Just for fun - Helpful Hint Number 4 : Always use a bone folder to score your card bases. It really does give them a much nicer finish!!!!
SO - ready to give this a try? I am planning on teaching this card at my July Fabulous Friday class. July 17th is the date - email me to book a place. The cost is $15 and along with this beauty, we'll be making 4 other fabulous cards!

Recipe:
Stamps: Branch Out, Teeny Tiny Wishes
Paper: Whisper White, Chocolate Chip, Gable Green, Glorious Green
Ink: Chocolate Chip, Mellow Moss, Old Olive, Gable Green, Summer Sun
Accessories: Brayer, Large and Small oval punches, word window punch, Earth Elements eyelets, linen thread, crop-a-dile, sponge

Hugs
Megan

Wednesday, June 24, 2009

Razzleberry Retirement!

I'm still playing with the sneak peak stuff - I just can't seem to keep my hands off it no matter how hard I try to love on my older stamps!!

This card uses a set called "Circle Circus" and it is a bunch of circles with different designs in them. Love it - it's such an easy set to use. I know that it will be used much over the next few months!

This card I clear embossed one of the circles on the Night of Navy cardstock and tied some ribbon onto it. (To heat emboss a stamp you stamp the image in Versamark, and then pour the embossing powder over it. Tap off the excess and then use a heat tool to melt the powder till it shines. You can see my post about the wonders of Versamark here.) Then I simply added a sentiment, and stamped the same circle on Whisper White and punched it out with a circle punch and them overlayed it on one of the embossed circles. Very simple and easy - try it for yourself!

If you haven't already let me know that you want one of the new Idea Books and Catalogs, let me know. They arrive today- YAY!!! Send me an email here and put New Catalog in the Subject and I'll make sure you get it!

Recipe:
Stamps: Circle Circus, Teeny Tiny Wishes
Paper: Rich Razzleberry,Night of Navy, Whisper White
Ink: Versamark, Night of Navy
Accessories: Rich Razzleberry Ribbon, word window punch, 1 1/4 circle punch, clear embossing powder

Enjoy your day

Hugs
Megan

Tuesday, June 23, 2009

Technique Tuesday - Image Interrupted


I've got no idea what to call this technique, and I'm sure I'm not the inventor of it!!!!! So - I just called it 'image interrupted' - maybe it'll catch on!!!!

I cannot get enough of these new In Colors! It took me a long while to get the hang of these retiring ones, but have to say that I will really miss Baja Breeze. This new lot however are just so much more me! Nice and bright and FUN!!!!!!!!!

I stamped the image onto the DSP (Razzleberry lemonade - sneak peak!), but cut some of it off on the right side. The images in the corners are a different stamp, even though they look like they belong to the one big image!!!! I then lined up the bird image with the stamp-a-ma-jig so that I could line it up perfectly. You NEED this tool! So, when I placed the DSP back on the white layer, the pink finished off the image! Neat huh?

The bird image on the DSP is stamped in Versamark and then heat embossed with white embossing powder. Isn't he adorable? This is a sneak peak of a new Level 2 Hostess gift set -so the only way to get a hold of him is to have a funshop with me! Book in today so that you can earn this sweet little guy FREE!It gives it a really cool relief feel against the busy background of the paper. Let me know what you think by leaving a comment on the bottom of the post!

Recipe:

Stamps: Wings of Friendship(Level 2 Hostess set), Friends 24-7 (sentiment)

Paper: Melon Mambo, Crushed Curry, Pretty in Pink, Razzleberry lemonade DSP (all NEW In Colors!)

Ink: Melon Mambo, Versamark

Accessories: Large oval punch, scalloped oval punch, white embossing powder, stamp-a-ma-jig

Hugs

Megan

Monday, June 22, 2009

Friendly Wheels class

Aren't these great?!

Wouldn't you want to make this as a gift for someone you love?
Good news!!! You can! I am having a class to teach you some fantastic new techniques with Stampin' Up!'s wheels. This wheel is just so versatile, you'll be using it for years to come!
The class will be at my home in Parker, Colorado on July 10th at 7pm.
For the fantastic price of $30 you get the Friendly words wheel with a handle to case it, all of the materials you need to create this set and it's all pre-cut and measured for you ready to go!
I will need to have payment made before July 1st to make sure that I will have your wheel and handle ordered and delivered before the class. Just hit the Paypal button below and use your credit card for payment (you don't need a Paypal account to do this!)
I can't wait to how you these fabulous cards - so what are you waiting for, hit the button NOW!!!!


Hugs
Megan

Thursday, June 18, 2009

Sponging Tutorial

Remember this card from yesterday? Well, here is a simple, simple tutorial that shows you how I created that background.
This is the finished card that I made for this tutorial - and we'll get into some of the mistakes in it in a moment!

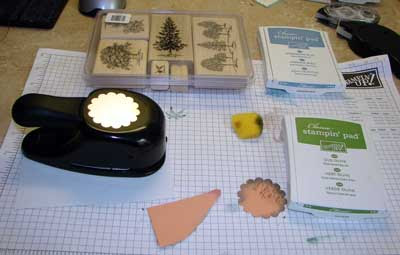
First - here are the supplies that you will need:

You'll need the scallop circle punch, some scrap paper, your cardstock for your card base, and some more if you choose to embellish it (the oval on mine), and some light neutral cardstock for the front. (Hint: A card front layer is 4"x 5 1/4")
Now onto the clouds! I cut off a bit of sponge for every new project that I make (it makes clean up easier and makes the sponge go a bit further!) Oh, I also have one that is about an eighth of the sponge that is purely for Basic Brown - the color that I most often sponge with!
Now, after you have punched out the scalloped circle, place it just down from the top of your paper. Put some ink on the sponge and wipe it down from the scrap paper. Move it to another area, overlapping the scallops a bit and repeat. Keep doing that along the top of the paper until you are happy with the look. Then make sure that you sponge the edges as well where the clouds are to fill them in a bit.
Now onto the grass! Just rip a bit of scrap paper so that it has a little bit of a curve, and place that above where you want the grass to be. In the same way that you did the clouds, sponge down from the paper. If you do this wrong, the hills will look wrong (and yes, I DO know that from personal experience!!!!!)
Oh - just a quick hint: If you do stuff up one side, remember that Stampin' Up! papers are two sided and so you can just flip it over and start again on the other side!

This is what your finished background will look like - except that of course, yours will be in focus!!!!!!
Now you just have to put in any other images you want and embellish it!
Now some more hints - if you have a look at the oval image on mine - I used the Old Olive marker to just ink up that tiny bit of the stamp, but I caught some of the hill for the next set of trees. BIG HINT: when you do this technique, use a blender pen to wipe off the excess to get a clean image.
Next thing - use the stamp-a-ma-jig when you need to get word on! Mine are really crooked - but that's what you get when you are totally impatient!!!!!
So there you have it! Now go ahead and create your own sponged background!
You can place an online order here to get your own products to create a masterpiece like this!
Or book your won workshop and we can make a card like this for all of your friends! Email me to book a date.
Recipe:
Stamps: Lovely As A Tree, Teeny Tiny Wishes
Paper: Brilliant Blue (card base), Bordering Blue, Naturals Ivory
Ink: Old Olive, Bordering Blue, Basic Brown
Accessories:Sponges, Scallop Circle punch
Hugs
Megan


Wednesday, June 17, 2009

Will's birthday card!

Today my baby turned 7! Not so much a baby anymore, but still awfully cute!!!


Don't think he got the hang of smiling before he opened his pressies!!!!!!!

Anyway, here is the super cool card that I made for him. It's called a spinner card, and I used one of his favorite sets 'Prehistoric Pals'. The blue one on the bottom actually spins around and along the track there - way cool! I made the sky and the ground by sponging the ink over the top of scrap paper - stay tuned for tomorrow's little tutorial on that!


Call me or go online to my SU website to place an order so that you can make a cool card for the super cool kids in your life. Or better yet, book a workshop with me and earn it for free! 303 805 2344

Recipe:

Stamps: Prehistoric Pals, Teeny Tiny Wished (sneak peak set - absolutely fabulous!!!)

Paper: Not Quite Navy, Whisper White

Ink: Not Quite Navy, Garden Green, Brocade Blue

Accessories: 1/2" circle punch, scallop circle punch, 2 pennies(!!)

Hugs

Megan