Showing posts with label masculine cards. Show all posts

Monday, September 19, 2011

Yes - I think I am still alive!

I know that I have been MIA from this blog for quite a while! But you know - life and stuff!!
So what we are going to do is just pretend every time I do this (you and I both know that this may happen again even though I will promise that it wont!!!) that it didn't really and just proceed as though I had been psting every day. Deal? Deal!!!!!

Thanks for being so great about this!

So - what Have I got to show you? September Shoppe cards is what!!! If you haven't been coming along and creating these masterpieces, you have been missing out!

So - without further ado - here they are!


I know - aren't they super cute? AND super easy!!! ANY of you could create these in your own home! SO come on out the net time I have a shoppe and learn how to use your supplies to make super quick and easy-peasy, Japan-easy cards like these!!

I'll let you know when the next one is so you can plan on being there!

Tomorrow I'll give you a look at the scrapbook pages we have been creating....tune in peeps!

Hugs
Megan

Tuesday, September 29, 2009

Black Medallion Birthday

I always find that it is so much harder to come up with male birthday cards. For some reason it is so much easier to come up with girly cards!

This one was from Friday's Fabulous Friday night cards. What? You missed it??? Let me know that you want to get on my mailing list to make sure that you don't miss the next one!

This one was very simple. It uses the new Night and Day Designer Series Paper (DSP) and the Medallion background stamp. It was embossed with black embossing powder and then three black brads were stuck in. Simple, simple, simple!

Give me a call or email me to place an order for the supplies to make this card. You'll never be stuck without a male card again!

Hugs
Megan

Recipe:
Stamps: Medallion Background stamp
Paper: Night and Day DSP, Whisper White Card stock
Ink: Versamark
Accessories: Black embossing Powder, Black brads

Thursday, August 27, 2009

Lovely collage

Here's another male card! I really loved the look that stamping over and over each other gives. I call it collage - but I've got no idea if that is the right term or not.

I used all of the images in the Lovely as a Tree stamp set and used different greens on the leaves. Matting the different elements created some space around them and makes it really easy on the eyes!

I stamped all of the images on the same piece of card stock, and then cut the paper. I punched out the sentiment and then put in some brads - and Bob's your uncle!

If you want to learn how to create this sort of 'collage' give me a call - I'd love to show you.

Hugs
Megan

Recipe:
Stamps: Lovely As A Tree, Teeny Tiny Wishes
Paper: Very Vanilla, Chocolate Chip, Old Olive
Ink: Chocolate Chip, Old Olive, Sahara Sand, Creamy Caramel, Handsome Hunter
Accessories: Gold brads, Punches

Wednesday, August 26, 2009

Male birthday

Isn't this paper gorgeous? It's some of the new Designer Series Paper in the new catalog - Nouveau Chic. It has 6 different double-sided papers in the pack - and all of them are totally yummy. You want this paper. Seriously, you do!

Anyway - I realized that I hardly ever create male themed cards, so it's always a mad dash to get one made when I need one. So, here is the finished product. Very simple, but I think that the DSP really makes it!

The focal image is from one of the sets that is in limbo (oops- I mean dormant!) so it is not in the current catty, but might or might not make it into the next one. But you can buy it right now. It's called Lexicon of Leaves, and it is one of my favorites (I love leaves!)

The easiest way to match the colors on any DSP is to have a look at the catalog. Big Tip: If you look right beneath the pictures of the paper (pages 160 - 163) there is a guide with the colors that are used in the paper. it makes matching them so, so easy. you really can't go wrong!

If you don't have your catalog yet, give me a call on 303 805 2344 so I get one out to you right away!

While I had the supplies out for this card, I made another one here on my Facebook page. Have a look and tell me what you think.

Hugs
Megan

Recipe:
Stamps: Lexicon of Leaves, Sincere Salutations
Paper: Nouveau Chic DSP, Sage Shadow, Going Gray, Basic Black, Very Vanilla
Ink: Sage Shadow, Going Gray
Accessories: Black Brads

Thursday, August 13, 2009

Sponged Tulipe

Isn't this stunning? I am falling in love with my "En Francais" Background stamp again this week! And I just LOVE how this card turned out.

I stamped the background image in Versamark and then embossed it with white embossing powder. Then after I had cut out the Tulipe design out of scrap paper with the Big Shot, I used the 'leftover' as a mask and sponged Creamy Caramel with a sponge dauber over the background. Big Tip: Use some removable adhesive to keep it in place while you sponge.

The Tulipe design is a Stampin' Up! exclusive - you can only get that one from me folks!!! (well, or another SU! consultant!! But I'm your fave, right?!)

It looks like the writing in the background is stamped over the Tulipe design - cool, huh? The ink wont stick to any of the embossed image and that's how you get such a cool look. I used the same technique here on this card over on my Facebook page, (it's exclusive content for my Facebook fans!)

Hope you enjoyed this - but if you'd like to learn how to do it for yourself, give me a call and I'll book you in for your own personal class with some of your friends!

Hugs
Megan

Recipe:
Stamps: En Francais Background Stamp
Paper: Creamy Caramel, Chocolate Chip
Ink: Creamy Caramel
Accessories: Tulipe Big Shot Die, Gold Brads, White Embossing Powder, Heat Tool


Wednesday, August 12, 2009

Medallion Sunset

Remember how I told you I loved this stamp? Well, this is another reason why!!!

I cased this from Michele Zindorff (who gives great tutorials on her blog), and this is the result. You can tell from the shine on the medallion that it is embossed, and that is how you can get such a great look.

The tree is embossed and then the back was rolled with the brayer, then the 'sun' is embossed with clear embossing powder over that. The rest of the card is sponged with different layers to get the sunset feel. isn't it gorgeous? And it's really not as hard as it looks - it just takes a little bit of practice (which I still need more of!)

So - if you would like to learn some great sponging tricks, book in a workshop with me and I'd be happy to teach you and your friends. And September is a Fabulous time to book one - Stampin' Up! is giving a sensational offer to their Hostesses in addition to the fabulous gift program they already have - you wont want to miss it! I look forward to your workshop soon!

Hugs
Megan

Recipe:
Stamps: Branch Out, Medallion Background stamp
Paper: Whisper White, Not Quite Navy, Basic Black
Ink: Versamark, Basic Black, Apricot Appeal, Chocolate Chip, Tempting Turquoise, Pumpkin Pie
Accessories: Clear Embossing Powder, Gold Brads


Tuesday, June 30, 2009

Circle Circus Birthday

I saw a color challenge this morning and was really taken with it. Not Quite Navy, Old Olive, So Saffron and Rose Red. Don't they look stunning together?

Today's big tip is this: When you want to use the same colors on a sentiment as background stamping, stamp off the first 'generation' and use the second or third. To make that clearer - every time you stamp an image after you have inked it up we call a generation. Thus - first stamp, first generation; stamp again without re-inking it, second generation; stamp again and it's the third generation.

You can see it on the little panel with the birthday sentiment. I really wanted to use the same colors as the main panel, but I knew that Not Quite Navy and even the Old Olive would be too dark. So, I stamped the circle image onto my grid paper once first with the Old Olive before stamping it onto the Whisper White, but stamped it off twice with the Not Quite Navy. Now you get a cohesive look without having to look for a lighter color that co-ordinates! What a time-saver!!

Another Big Tip: Use the Mat pack to line up your brads so that there is an equal space between them all. Seriously, that little kit is AMAZING!

Try it yourself next time that you want to get your background the same colors! And if you would like to get together with your friends and have me give you all a private class on this or any other technique, just drop me a line! I'm booking my July 'funshops' now, so call quickly to get the date you want before it's gone!

And just a reminder that the new Stampin' Up! Catalog goes live tomorrow! You can place an online order on my SU! website here.

Recipe:
Stamps: Flight of the Butterfly, Upsy Daisy (sentiment)
Paper: Rose Red, Not Quite Navy, Old Olive, So Saffron, Whisper White
Ink:Rose Red, Not Quite Navy, Old Olive, So Saffron
Accessories: Earth Elements (Not Quite Navy) brads.

Hugs
Megan

Thursday, June 18, 2009

Sponging Tutorial

Remember this card from yesterday? Well, here is a simple, simple tutorial that shows you how I created that background.
This is the finished card that I made for this tutorial - and we'll get into some of the mistakes in it in a moment!

First - here are the supplies that you will need:
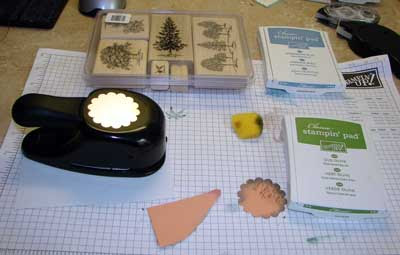
You'll need the scallop circle punch, some scrap paper, your cardstock for your card base, and some more if you choose to embellish it (the oval on mine), and some light neutral cardstock for the front. (Hint: A card front layer is 4"x 5 1/4")
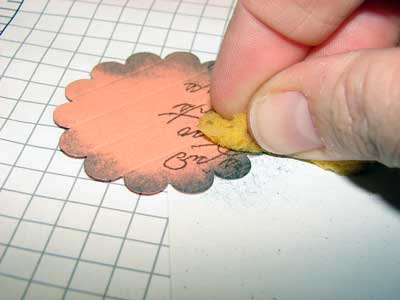
Now onto the clouds! I cut off a bit of sponge for every new project that I make (it makes clean up easier and makes the sponge go a bit further!) Oh, I also have one that is about an eighth of the sponge that is purely for Basic Brown - the color that I most often sponge with!
Now, after you have punched out the scalloped circle, place it just down from the top of your paper. Put some ink on the sponge and wipe it down from the scrap paper. Move it to another area, overlapping the scallops a bit and repeat. Keep doing that along the top of the paper until you are happy with the look. Then make sure that you sponge the edges as well where the clouds are to fill them in a bit.
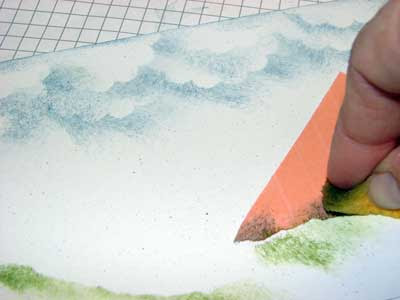
Now onto the grass! Just rip a bit of scrap paper so that it has a little bit of a curve, and place that above where you want the grass to be. In the same way that you did the clouds, sponge down from the paper. If you do this wrong, the hills will look wrong (and yes, I DO know that from personal experience!!!!!)
Oh - just a quick hint: If you do stuff up one side, remember that Stampin' Up! papers are two sided and so you can just flip it over and start again on the other side!
This is what your finished background will look like - except that of course, yours will be in focus!!!!!!
Now you just have to put in any other images you want and embellish it!
Now some more hints - if you have a look at the oval image on mine - I used the Old Olive marker to just ink up that tiny bit of the stamp, but I caught some of the hill for the next set of trees. BIG HINT: when you do this technique, use a blender pen to wipe off the excess to get a clean image.
Next thing - use the stamp-a-ma-jig when you need to get word on! Mine are really crooked - but that's what you get when you are totally impatient!!!!!
So there you have it! Now go ahead and create your own sponged background!
You can place an online order here to get your own products to create a masterpiece like this!
Or book your won workshop and we can make a card like this for all of your friends! Email me to book a date.
Recipe:
Stamps: Lovely As A Tree, Teeny Tiny Wishes
Paper: Brilliant Blue (card base), Bordering Blue, Naturals Ivory
Ink: Old Olive, Bordering Blue, Basic Brown
Accessories:Sponges, Scallop Circle punch
Hugs
Megan